|
1/16/2019 0 Comments Whole30 Pizza RecipeThis Whole30 Pizza recipe uses a cauliflower crust as the base and is topped with tomato sauce, prosciutto and arugula and is perfect for your weekly pizza night.
You read that right-yes, you can have pizza during whole30! …with some modifications of course. This whole30 pizza recipe will leave you feeling satisfied and SO happy, because pizza = happiness. The one thing I'm currently craving while doing this second whole30 is….. everything. I'm craving bread and sugar and all my normal foods, one of them being pizza. I know so many people work pizza into their weekly meal plan, and I don't want anyone to have to go an entire month without their beloved pizza night. This whole30 pizza recipe is surprisingly filling despite the fact that the crust is made of cauliflower. Have you tried cauliflower crust pizza? I know it's been all the rage for at least the past year, probably longer. Truthfully, I don't eat pizza often enough to feel like I need to sub out regular pizza crust. But, now that this cauliflower crust has made its debut into my life, I'm thinking that I might need to start a weekly pizza tradition for myself.
So what's on this whole30 pizza anyway? What can you possibly eat?! It all starts with the cauliflower crust. Tip: buy bagged cauliflower rice if it's available to you. This will save you time and you'll be left with less dishes in the end. Tip: ALWAYS use parchment paper when making a cauliflower crust. This will make it way easier to transfer the pizza onto your plate and assure that the crust doesn't stick to the pan. Cauliflower rice, egg, almond flour, herbs, and some salt are the ingredients in this cauliflower crust. You'll stir everything together and then use your hands or a spatula to form the “dough” into a circular crust. Once the crust is made, you'll bake the crust in the oven for about 15 minutes. Then, you'll add on your appropriate toppings. Available pizza toppings include but are not limited to: tomato sauce, roasted garlic, caramelized onions, really any kind of vegetable, and any kind of meat too, so you really shouldn't feel deprived.
For this recipe, I opted to use roasted garlic marinara sauce as the base, and then I topped it with prosciutto and arugula. I wanted to keep things simple and show that you don't need a ton of toppings for this to be a flavorful recipe, though of course you can add more toppings. After you decide on your toppings, you'll add them on top of the baked crust then place the pizza bake into the oven to bake for an additional 10 minutes. Last, you slice it and eat up! Note: I also decided to whip up a quick sauce while the pizza was in the oven, because I'm all about dips! I made Eat the Gains whole30 buffalo sauce and it was amazing! I hope this whole30 pizza recipe makes its way into your life, even if you're not doing whole30. Trust me when I say I had low expectations for this recipe-I mean, who actually wants to eat cauliflower crust?-but it surprised me in the best way possible. If you make this recipe, remember to tag @thealmondeater on Instagram! Whole30 Pizza Recipe This Whole30 pizza recipe will be your new go-to during your whole30. It's made with a cauliflower crust and you can use as many compliant toppings as you wish!
Ingredientsfor the crust:
for the pizza:
Instructions
NotesYou can use whatever compliant toppings you want! Feel free to add more toppings and/or your own vegetables or meat–whatever your heart desires. Keywords: whole30 pizza, cauliflower crust pizza The post Whole30 Pizza Recipe appeared first on The Almond Eater.
0 Comments
Pine straw is a popular feature of outdoor autumn décor all around Alabama, and more people across the country are also beginning to use it as an eco-friendly, organic mulch. There are a lot of reasons to use pine straw, but before you start raking it up, keep one thing in mind. Bugs that are looking for somewhere warm to settle down for the winter also love pine straw. That's right, insects like pine straw even more than avid gardeners. Here's why. 3 Reasons Insects Love Pine Straw in the FallPine straw itself doesn't attract insects. Bugs don't eat dry pine straw, but other qualities draw in bugs including termites, centipedes and earwigs. Some of these insects help break the pine straw down, which is good for deterring weeds, but for the most part its best to keep critters away from your house. Like other types of mulch, pine straw can serve as a hideout as well as a route for bugs to get in or near a home. As we mentioned in an earlier post, when the weather cools off bugs will be attracted to your warm home for hibernation and are looking for a way to get in. If pine straw is right up against the foundation, on the porch, etc., insects will see it as an invitation to venture further inside. Even if they don't get inside, the pine straw acts as a ground insulator, which is another reason it attracts insects that are looking to stay warm. Homeowners use mulch to protect roots from freezing like a blanket. Just know that insects may also snuggle underneath.
Yet another double edge sword of pine straw is that it can hold in moisture. This is preferable for your plants, but it can also cause rot in wood, attracting different types of ants and other bugs in the early fall. The moisture also makes pine straw edible for a variety of insects, and termites need high moisture levels to survive. But don't worry if you've already spent the time to collect a pile of pine needles and have covered your garden beds. When placed properly pine straw can be used to give you all the mulch benefits without the bugs. Tips for Keeping Pine Straw from Causing Pest ProblemsWith pine straw it's all about placement and upkeep. Where you put it directly affects how many troublesome bugs start hanging around. Follow the tips below and you'll have a lot fewer pests to worry about this fall. Don't put pine straw right up against the house. This makes it much easier for bugs to get inside where they don't belong. Instead, stop the mulch line at least a foot or two away from the foundation. Create a barrier between the house and the pine straw. Just as with other types of mulch, it's best to put a barrier between any structures and the pine straw. Pea gravel is an excellent option to use as a barrier. Only make it 2-3” deep. In Alabama and other areas with somewhat mild winters that's all it takes to keep root structures warm. It's also shallow enough so that the pine straw won't retain moisture and attract insects. Keep pine straw mulch shallower in moist areas. If an area is typically moist (spots that are shaded all day or near the gutter outlet) the mulch needs to less than 2” deep. Opt for long or standard length pine needles that are on the heavier side. Pine needles come in three lengths: 12”, 9” and 6”. The longer and heavier the needles are, the better they will interlock without compacting. This decreases the chances of the needles blowing out of place closer to the house when the first strong gust of wind comes along. Denser pine straw is also less likely to retain high levels of moisture. Rake the pine needle mulch every now and then. Raking helps to aerate the pine needles so it's less likely to lock in moisture. This will also help prolong decomposing, which typically occurs within 2-4 months. Skip natural pine straw decor. If you love the look of pine straw wreaths and house decorations, it's best to fake it. Synthetic pine straw decor won't attract insects and you can use it again next fall. Even if you are careful when placing pine needles so that they don't encourage bugs to hang around, the safest bet is to schedule regular pest control treatments even when the weather cools off. The experienced techs at Vulcan Termite and Pest Control Inc. know where all the fall pests like to hide and can treat the pine needle mulch without harming your plants. Give us a call for more tips on using pine straw in your yard or to make an appointment! Original Source: https://www.vulcantermite.com/garden-pest-control/pine-straw-pests-need-know-fall/ The post Pine Straw and Pests: What You Need to Know This Fall appeared first on Vulcan Termite & Pest Control.  Taking advantage of space is important when it comes to the laundry room. It seems like we spend so much time sorting, loading, unloading and folding, so why not make it a place you enjoy being in? Welcome to 2019! As is often the case, with a new year comes a flood of intentions and goals. One common goal is to finally get home organization under control. With the kitchen being the heart of the home, it is a wise place to start the organizing process. But how can you translate your need to organize into actionable tasks? What tools can help you in this endeavor? Here is a look at the ways you can make smart choices with your kitchen design and in turn, get organized [Where do I get the best design ideas?]. Pamper Your PantryA common culprit in a messy kitchen is the pantry. This can be for a variety of reasons. A lack of space can make storage cramped and disorganized. Equally painful is having limited access to kitchen items. Our Solution – Roll-out Trays Say “goodbye” to the days of digging in your pantry for the assortment of items needed to make dinner. Instead, consider the ease of roll-out trays in your kitchen. Beautiful dovetailed roll-out trays bring the entire shelf contents out for easy access and full visibility Unruly Small ItemsHave you ever reached into your cabinet for the salt only to have to shuffle through 30 other spices? Small items can easily eat away room in your cabinets and lead to clutter in the kitchen. Our Solution - Pull-out Storage Cabinet Have ease and visibility to see and access your smaller kitchen items like spices, herbs, and jars with the help of the pull-out storage cabinet. The adjustable shelves help keep these small items at bay. The Sink of No ReturnAnother common offender in a messy kitchen is the dreaded sink base. From hard to reach trash cans to crowded cleaning items, a sink can easily turn into the place of no return. Our Solution: Super Sink Base Organizing your cleaning items will offer a simple solution to fighting the dead zone in your kitchen. Declutter your sink with the help of a super sink base. Components of this storage solution include a tilt-out tray to storage sponges, scrubbing brushes, and scouring pads, a basket pull-out for cleaning supplies, a sink base liner to protect your sink base from leaks, and a towel bar. Cooking and Baking StorageStill wondering whatever happened to the lid from your spaghetti pot? Or the cookie trays you got last Christmas? What about that collection of container lids that vanished without a trace? Prevent items getting lost in your kitchen by taking advantage of cabinetry to help organize cooking and baking items. Our Solution – Tray Divider and Multi-Storage Drawer Never worry about keeping long or flat kitchen items organized again with the help of a tray divider cabinet. Available on base cabinets, refrigerator walls cabinets and over drawer cabinets, this divider keeps baking pans, cutting boards, and serving trays neat and organized.  Whether you're taming an avalanche of lunch containers, pantry items, or pots and pans, the multi-storage drawer offers versatile organization for your kitchen design. The post 4 Ways to Organize Your Kitchen for the New Year appeared first on CliqStudios. Sponsored by Thrive Market Winter is here, and it's chilly (pun intended)! Cozy up with Thrive Market, your go-to online shop for affordable Whole30 Approved staples to use all #JanuaryWhole30 long. Today, we're teaming up with Thrive Market to share a sneak-peek recipe from Melissa Hartwig Urban's newest book, The Whole30 Slow Cooker, featuring more than 150 recipes for your slow cooker and Instant Pot. Prediction: It's your new favorite recipe to enjoy on a chilly evening, made easy when you shop Thrive Market's digital aisles to gather the ingredients you need. Before you start cooking, click here to shop Melissa's Thrive Market favorites and get an additional 25% off your first order! White Chicken Chili With Sweet PotatoesSERVES 4 | PREP: 35 minutes | SLOW COOK: 5 hours (low) or 2 ½ hours (high)| TOTAL: 6 hours Ingredients Instructions PLACE the chicken in a 4-quart slow cooker. Add the broth, sweet potato, onion, green chiles, jalapeño, garlic, cumin, oregano, chili powder, cayenne, salt, and pepper. Stir to combine. COOK on low for 5 to 6 hours or on high for 2 1/2 to 3 hours. TRANSFER the chicken to a plate; cover to keep warm. Turn the slow cooker to high if using the low setting. Add the coconut cream, butter, lime juice, and nutritional yeast (if using) to the slow cooker; stir to combine. Cover and cook for 20 minutes. USE two forks to shred the chicken. Return the chicken to the slow cooker. Cover and cook for 10 minutes. Stir in the 1 tablespoon minced cilantro. SERVE with the avocado and more cilantro. Ready to get cooking? Click here to get an extra 25% off your first Thrive Market order. This post was sponsored by Thrive Market; thank you for supporting our Whole30 partners. The post White Chicken Chili from The Whole30 Slow Cooker, featuring Thrive Market appeared first on The Whole30® Program. So, yes, it's wintertime and it's really cold outside. Far too many people think that once winter weather hits, they have to stay holed up inside their homes. But what about your beautiful backyard and all the enjoyment your family gets out of it? There's no reason to limit yourself to the summer when it comes to outdoor entertainment. Consider installing a fire pit to make even the darkest winter nights sparkle with fun. How can I use my fire pit in the winter? The same way you would use it in any other time, really! You might have to swap out some of the usual fare- think of trading in your icy lemonade for a toasty cup of cocoa- but sitting around the fire with family and friends never goes out of season. Your fire pit will offer both light and warmth while you still get to enjoy the fresh air. Why have a fire pit at all? Entertaining guests in front of cozy blaze is a surefire way to keep them happy. But a fire pit provides more than that for your home. It can also be made to be a decorative and appealing part of your landscaping, and the addition of a fire pit will also add value to your home. With all the benefits it can provide, why not call your landscaper today to install your fire pit?
If you have any questions, contact Rhine Landscaping by calling 410-442-2445 or click here today! Rhine Landscaping in Baltimore, Maryland can handle every aspect of your landscape, from hardscapes and patios / walkways, to retaining walls, water features such as fountains, fireplaces/ firepits,swimming pools, landscape design, landscape installation, outdoor kitchens, decks, pavilions, basement waterproofing, drainage and more, Check us out on Facebook and Twitter as well! The post Enjoying a Fire Pit in the Winter Season appeared first on Rhine Landscaping.  Is a recession on the way in 2019? If you ask a CFO, there is nearly a coin-flip chance that the answer is yes. Ask a CFO if a recession will start by the end of 2020 and that number skyrockets to 82%, according to the latest Duke University/CFO Global Business Outlook survey. 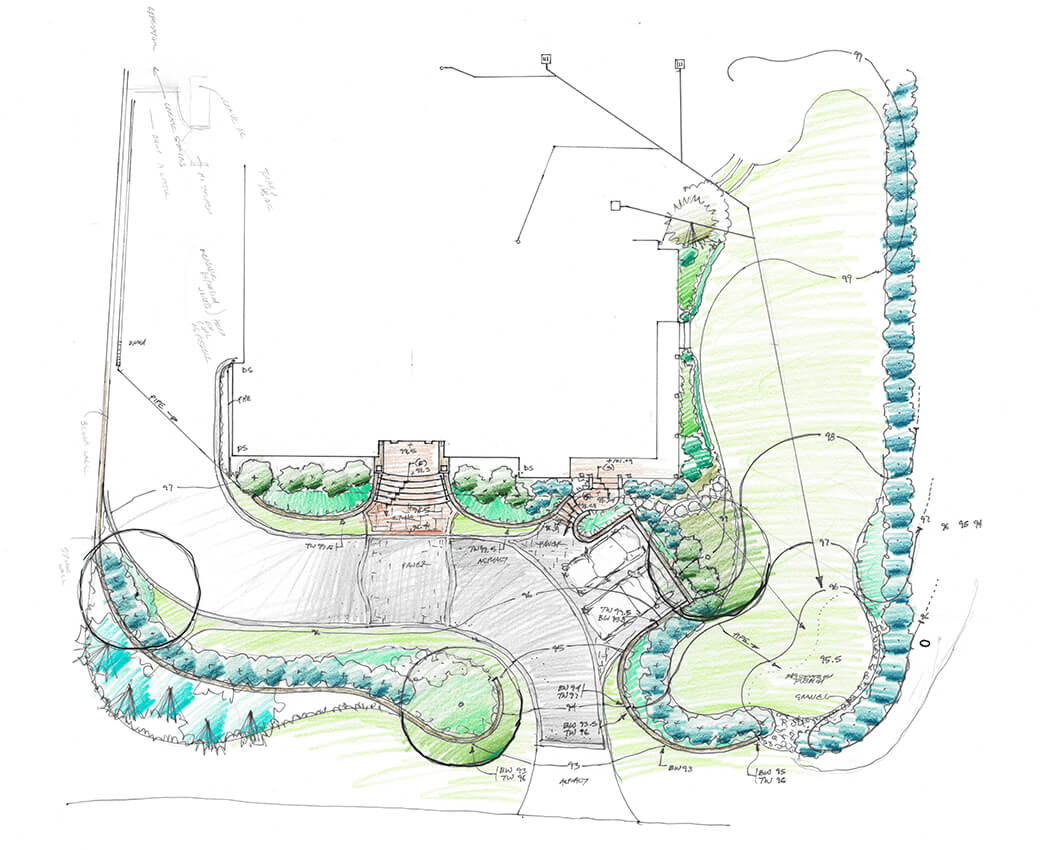
Landscape drainage is a critical factor in the success of any landscape design project. And most Northern Virginia properties have pre-existing drainage problems that must be addressed within the scope of a landscape design project. The first step for your landscape architect is to conduct a thorough site analysis and evaluation taking note of the existing slopes and elevation changes on the property, surface and groundwater (wet and dry areas), and soil composition. We want to be sure that rainwater is not puddling on hard surfaces but is directed to run off and sink into the ground. We want soil around plants and trees to drain efficiently so plants will stay healthy. The Necessity of a Landscape Drainage PlanThe effectiveness of the drainage system on a property overall and techniques that support well-drained planting beds have a direct bearing on the health and longevity of your garden plants. A sound landscape drainage plan is comprised of two principal parts: one relates to hardscaping and the other to planting beds.  Drainage and Hardscaping We often use slot drains along the perimeters of patios and walkways to take rainwater straight into the ground. We also adjust grading on the property to control the direction and flow speed of surface water. We may direct rainwater toward a natural slope or to an area where we've installed a small culvert or drain box. Drainage and Plants A raised bed will usually have low retaining wall bordering it. Mounding doesn't require hardscaping. In both, we use a balanced blend of sand, soil, and compost to build up the mound so it is stable, provides nutrients, and drains properly. Drainage Solution 1: A Damp Yard Reclaimed The owners of this McLean residence rarely used their backyard patio because it always felt damp and uncomfortable. During heavy rainstorms, water would sometimes flood the lower level of the house. A landscaping project not only beautified the backyard but permanently fixed their serious drainage issues. We dug an infiltration trench in the front right corner of the side yard. All the downspouts from the house tie into it. An infiltration trench sinks about six feet into the ground. It is lined with fabric, filled with layers of sand, clean washed gravel and topped off with about a foot of well-draining topsoil. Excess water filters into the ground. Although you can't see it, this part of the drainage plan was vitally important the success of this landscape design project. If the property didn't drain properly, plants and people would suffer from too much moisture. Making an outdoor environment beautiful is important, making it comfortable and fully functional is essential. Drainage Solution 2: A Low Spot Becomes a Highlight  This Herndon residence had drainage problems that made it impossible to plant anything to make the front entry attractive. The ground sloped left along the front of the house toward a lot spot where water collected and pooled against the foundation. A front entry landscaping project beautified the curb appeal of the home while solving the drainage problem. We ran drainage pipes under the driveway to draw excess water away from the house, then built up the garden beds above the previous ground level and held them in place with a low retaining wall. Drainage Solution 3: Beautiful & Practical
The Design You Don't See
All of the example projects began with a desire on the part of a homeowner to correct a drainage problem that was preventing them from using their yard or was interfering with the ability of landscaping plants to establish and thrive. If you feel that landscape drainage issues are preventing you from fully enjoying your outdoor living areas, contact one of our landscape architects to schedule a consultation.  Sleeping should be a relaxing, worry-free necessity, and if it's not, why is that? There could be a long list of reasons why you are having trouble sleeping peacefully. If you are a New Jersey local the main reason could be because of unwelcome guests. According to the NJ Department of Human Services, bed bugs are infiltrating a number of households, dormitories, hotels, and other popular establishments. Is it time to hire experts in NJ pest control? What can you do to stop those creepy bed bugs from spoiling your sleep? Below are a few tips offered by informed human services authorities: Covering Your Tracks Like most unwelcome guests, bed bugs tend to leave a path of evidence in their wake. Look out for bug bites, blood trails, brown stains on bedding, and even their shed skins. Here's what you can do to stop bed bugs from striking again: – Hire someone who is a currently licensed NJ pest control exterminator. – Find out if the company you're considering uses chemicals that are considered dangerous to your health. – Bag any infested articles of clothing or bedding and either dispose of them or wash them in water 120 degrees or hotter. Contact Stern Environmental for an appointment today! Our NJ pest control experts are knowledgeable and willing to help you rediscover your sound sleep! We eradicate bed bugs with methods that keep you and your loved ones safe! The post NJ Department of Human Services Offers Bed Bug Tips appeared first on Sterns Chatter. 1/12/2019 0 Comments Sunroom Office Switch-Up
The post Sunroom Office Switch-Up appeared first on The Lettered Cottage. |
AuthorWrite something about yourself. No need to be fancy, just an overview. Archives
January 2019
Categories |


 This Oakton residence sits on an expansive lot that had a combination of steep slopes and low areas. Extensive regrading and terracing made the backyard highly functional. A highlight of the drainage plan is the biofiltration sinks disguised by lush planting beds. The biofiltration sinks receive water from upper levels on the landscape and let it percolate naturally back into the ground-and at the same time feeding the moisture-loving bedding plants on the surface.
 Drainage design is the part of every landscape design you will never see. But everything you see and enjoy above ground is supported by it. If you skip investing in landscape drainage to save a little money, you will end up with issues after the fact. And that could end up costing you more because you may have to remove expensive hardscaping and landscaping to install a solution.
 I started painting the light fixture in my “office” this week. I've been wanting to paint it black for several months but I kept putting it off because I could never find enough time to do it. I finally just decided that was never going to happen and that I should just paint a little...
 RSS Feed
